

-

- alberthink
-
38 发帖1 回复462 积分
- 私信他 + 关注


 楼主
楼主
上回说到,通过Chrome提供的web蓝牙api,我们可以扫描可连接的BLE设备并发起建立连接,连接建立成功后,通过蓝牙服务和属性发现函数,我们将逐步扫描BLE设备上的全部服务和属性,并对我们感兴趣的属性作标记。下面是三个我所关心的BBC microbit蓝牙服务中提供的属性:加速度传感器数据、LED阵列状态和控制、产品型号名称。
if (characterisc.uuid == ACCELEROMETER_DATA) {

accelerometer_data = characterisc;

has_accelerometer_data = true;

}

if (characterisc.uuid == LED_MATRIX_STATE) {

led_matrix_state = characterisc;

has_led_matrix_state = true;

}

if (characterisc.uuid == MODEL_NUMBER_STRING) {

model_number_string = characterisc;

has_model_name_string = true;

}
当服务和属性发现函数完成全部发现过程后,将发现完成标志置位并回到connect函数体,此时的web蓝牙服务已经待命,等候网页使用者的指令了。
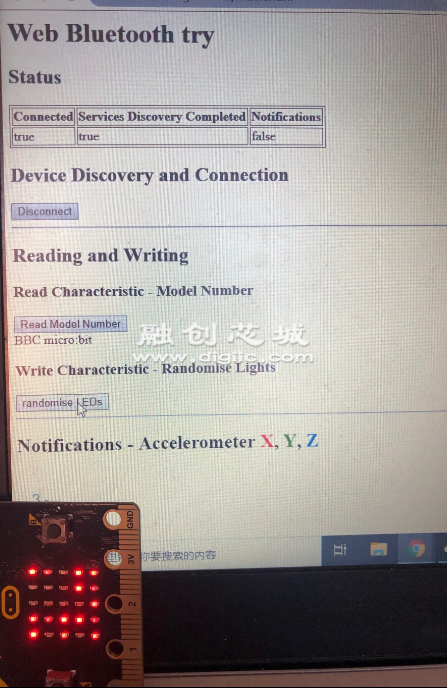
我们再看一下microbit和网页的状态:
Microbit再建立连接后显示字母“C”,而web页面的状态栏connected和services discovery completed栏目下均显示为true。在device discovery and connections下方的连接按钮也显示为disconnect,也就是按下该按钮就断开连接。
我们看看蓝牙服务的第一个读写服务:读取产品型号-read model number,该按钮点击后页面onclick触发函数readModelNumber()如下。
function readModelNumber() {

console.log("readModelNumber");

//state validation

if (!connected) {

alert("Error: Discover and connect to a device before using this function");

return;

}

if (!services_discovered) {

alert("Error: Service discovery has not yet completed");

return;

}

if (!has_device_information_service) {

alert("Error: The connected device does not contain the device information service");

return;

}

model_number_string.readValue()

.then(value => {

data = new Uint8Array(value.buffer);

model_number_string = new TextDecoder("utf-8").decode(data);

console.log(model_number_string);

document.getElementById("model_number").innerHTML = model_number_string;

})

.catch(error => {

console.log('Error: ' + error);

alert('Error: ' + error);

return;

})

}
在确认过状态参数有效后,model_number_string.readValue()返回promise,通过console和页面将产品型号读取出来。model_number_string是在服务属性发现环节确认过BLE蓝牙设备提供了MODEL_NUMBER_STRING属性后,该属性对应的句柄。
类似的,对于microbit的LED阵列的状态控制,在按下randomize LEDs按钮后,onclick时间触发randomLEDs()函数。
function randomLEDs() {
console.log("randomLEDs");
//state validation
if (!connected) {
alert("Error: Discover and connect to a device befofe using this function");
return;
}
if (!services_discovered) {
alert("Error: Service discovery has not yet completed");
return;
}
if (!has_led_service) {
alert("Error: The connected device does not contatin the LED service");
return;
}
if (!has_led_matrix_state) {
alert("Error: The connected device does not contain the LED matrix state characteristic");
return;
}
var led_array = [0, 0, 0, 0, 0];
led_array[0] = Math.floor(Math.random() * 32);
led_array[1] = Math.floor(Math.random() * 32);
led_array[2] = Math.floor(Math.random() * 32);
led_array[3] = Math.floor(Math.random() * 32);
led_array[4] = Math.floor(Math.random() * 32);
var led_matrix_data = new Uint8Array(led_array);
led_matrix_state.writeValue(led_matrix_data.buffer)
.then(_ => {
console.log('LED matrix state changed');
})
.catch(error => {
console.log('Error: ' + error);
alert('Error: ' + error);
return;
});
}
该函数确认蓝牙连接和服务属性状态后,产生了5个32以内的随机数(每个随机数对应一行LED)。同样通过发现服务属性是获得的led_matrix_state句柄,调用writeValue将数据写入LED状态属性。从而在BLE设备端得到LED蓝牙状态的相应改变。
怎么样,是不是很简单?BBC microbit的web蓝牙demo就这样完成了读和写操作。有兴趣的朋友可以尝试将型号名称改换,或者把随机产生的LED数改成你希望的样子(比如一个笑脸😀或者什么其他的图案)。
那么对于无线传感器最合适的消息通知notification,我们又是如何实现的呢?其实流程上和读写的操作类似,都是先通过web界面上的按钮触发的相关函数(toggleAccelerometerNotification)使能(或关闭)消息通知,同时在系统中注册(或注销)对应句柄下的event,该event相关的onAccelerometerData函数获取数据包并解包后输出。toggle和onAcc函数的内容如下:
function toggleAccelerometerNotifications() {

console.log("toggleAccelerometerNotifications");

//state validation

if (!connected) {

alert("Error: Discover and connect to a device before using this function");

return;

}

if (!services_discovered) {

alert("Error: Service discovery has not yet completed");

return;

}

if (!has_accelerometer_service) {

alert("Error: The connected device does not contain the accelerometer service");

return;

}

if (!has_accelerometer_data) {

alert("Error: The connected device does not contain the accelerometer data characteristic");

return;

}


//enable or disable notification

if (!notification_enabled) {

accelerometer_data.startNotifications()

.then(_ => {

console.log('accelerometer notification started');

setNotificationStatus(true);

//when a noticiation for a characteristic is received, an event if fired with the characteristic value attached to it

//below is to register a function to handle this event

accelerometer_data.addEventListener('characteristicvaluechanged', onAccelerometerData);

})

.catch(error => {

console.log('Error: ' + error);

alert('Error: ' + error);

return;

});

} else {

accelerometer_data.stopNotifications()

.then(_ => {

console.log('accelerometer notificaitons stopped');

setNotificationStatus(false);

//remove this event listener when we unsubscribe

accelerometer_data.removeEventListener('characteristicvaluechanged', onAccelerometerData);

})

.catch(error => {

console.log('Could not stop accelerometer_data notifications: ' + error);

});

}

}


//processing notifications

function onAccelerometerData(event) {

console.log("onAccelerometerData");

buffer = event.target.value.buffer;

dataview = new DataView(buffer);

// X = dataview.getUint16(0, true) / 1000;

// Y = dataview.getUint16(2, true) / 1000;

// Z = dataview.getUint16(4, true) / 1000;

X = dataview.getInt16(0, true) / 1000;

Y = dataview.getInt16(2, true) / 1000;

Z = dataview.getInt16(4, true) / 1000;

console.log("X = " + X + ", Y = " + Y + ", Z = " + Z);

document.getElementById("accelerometer_data").innerHTML = "X = " + X + ", Y = " + Y + ", Z = " + Z;

//draw();

// samplesCount++;

// if (samplesCount >= delayCount) {

// num_X = X;

// num_Y = Y;

// num_Z = Z;

// samplesCount = 0;


// // // Remove a number from the front of the data array

// // obj_X.original_data[0].shift();

// // obj_Y.original_data[0].shift();

// // obj_Z.original_data[0].shift();


// // // Add the new number on to end of the data array

// // obj_X.original_data[0].push(X);

// // obj_Y.original_data[0].push(Y);

// // obj_Z.original_data[0].push(Z);


// RG.Effects.updateCanvas(draw);

// }

num_X = X;

num_Y = Y;

num_Z = Z;

RG.Effects.updateCanvas(draw);

}
你也可以在library/webblue-phaseTwo.js文件中获得onAccelerometerData函数的相关内容。
具体的效果就是下图的样子:

需要注意的是,BBC microbit目前有两代不同的硬件,版本号V1.5及以后的版本采用的是LSM303AGR,其输出格式为MSB在前,16bit带符号整型;V1.5以前的版本是采用NXP的MMA8653,为MSB在前10bit无符号整型。所以如果是V1.5以前版本的microbit在数据解析时需要选用相关的无符号处理的方式。
到此为止,我们就基本上完成了web bluetooth在microbit上的演示。具体的web网页代码都可以在github上获取得到https://github.com/alberthinku/alberthinku.github.io。
你手上有的蓝牙开发板都有哪些,要不要拿出来一起玩玩呢?
 回复
回复
 举报
举报


-

- xiaomiking
-
1147 发帖6357 回复18609 积分
- 私信他 +关注


块
导
航
举报
请选择举报类别
- 广告垃圾
- 违规内容
- 恶意灌水
- 重复发帖
